Table of Contents
Introduction:
Before moving towards the Brinell Hardness Test we should know – What is the hardness of a metal? Hardness is resistance to plastic deformation of the metal and it is measure by the depth of the indentation. Hardness is not a property of the metal because it can be changed by several treatments like cold working and heat treatment. We can define hardness of the metal in different ways but in this article, we are focusing only on Brinell Hardness Test.
In the manufacturing industry, we are measuring the hardness of the metal by various hardness tests and one of them is the Brinell Hardness Test. In this article, we will see its performing methods, advantages, disadvantages/limitations, and applications.
See Also: Explain hydraulic grade line and total energy line
Brinell Hardness Test:

Brinell Hardness Test is one of the most important hardness tests in the engineering industry and metallurgy. It is used when the surface of the metal is very rough to use another hardness test on it. There are two methods to perform the Brinell hardness Test on the metal as follows:
- Standard Method
- Non-Standard Method
Standard Brinell Hardness Test:

In the standard method of the Brinell Hardness Test, we use 250 to 500 kg of load for soft material and 500 to 3000 kg of load for hard material such as steel and iron. In the standard method of the test, we use a ball indenter of 10mm diameter.
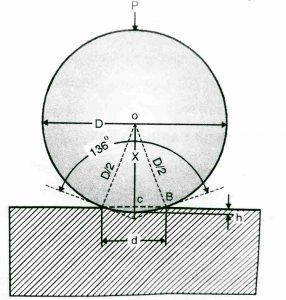
Let’s derive the formula of Brinell Hardness Number (BHN) for the Brinell Hardness Test.
B.H.N = Load Applied (Kg)/Area of Indentation
B.H.N= P/πDh
but, h = D-X/2 —– eq (1)
From the above figure, ΔOCB, we can say that,
OB² = OC² + CB²
(D/2)² = X² + (d/2)²
By solving the above equation for X, we get,
X = √(D² – d²)/2
∴ h = D – √(D² – d²)/2
From eq (1), put the value of h,
∴ πDh = πD(D – √D² – d²)/2
the above equation is of the area of indentation.
Therefore,
BHN = 2P/πD(D – √D² – d²) —– eq (2)
Where, P =Load in Kg
D = Diameter of the indenter in square mm.
Non-Standard Brinell Hardness Test:
In the non-standard Brinell Hardness Test, we use approximately 100 to 250 kg of load. In this method, we use a ball indenter of 1, 2.5 and 5mm diameter. Due to low load and less ball diameter, this test is used in commercial practices.
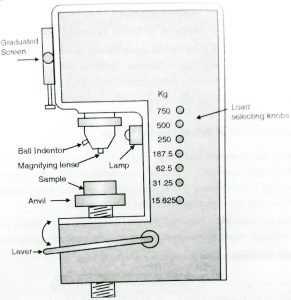
Above you can see the diagram of Brinell hardness testing machine equipped with various loads and multiple ball indentors. A load selecting knob is used to change the size of the load. The lever is used to move metal samples in an upward and downward direction. Metal samples are placed over the anvil and a lamp is fixed on the machine column to observe the process.
As we know that, Brinell hardness number (BHN) depends on the load. During the indentation process, the ball indentor does not make a constant angle with the sample surface. This indentor ball makes a large contact angle with the lower load which forms a small impression on the metal sample which resulted in less hardness.
Same as above, the indentor ball makes a small contact angle with a higher load which forms a bigger impression on the metal sample which resulted in more hardness. Therefore it concludes that Brinell hardness number (BHN) is dependent on the load applied.
According to the above observation,
d = D sinθ
Substitute the above value of d in eq (2), we get,
BHN = 2P/(π) D² (1 – cosθ)
We get the equation of BHN for the Non-Standard Brinell Hardness Test.
See Also: Stages of combustion in SI engine in detail
Advantages of Brinell Hardness Test:
- The flat irregular metal surface does not affect the Brinell hardness test.
- This hardness test is less sensitive.
- It is used to measure the hardness of components made from powder metallurgy and cast.
- It can bear the heavy load for testing.
- Indentation made on the sample can be seen and measure under a microscope or eyepiece.
Disadvantages of Brinell Hardness Test:
- The main disadvantage of this test is that it is not suitable for small size objects due to large indentor impression.
- Slightly inaccurate hardness measurement while testing hard objects as ball indentor deforms.
- Not suitable for thin objects due to deep penetration.
- This test can only perform on the flat surfaces.
- The Brinell hardness test is slow thus time-consuming.
- Chances of human error during measurements.
- The Components life may reduce because of high load and large impressions.
Applications of Brinell Hardness Test:
- The Brinell hardness test is defined in ASTM E10 is used to calculate Brinell hardness of the metal.
- It is used on the metal having a rough surface and harsh texture.
- The Brinell hardness test is used to measure the hardness of light metals like lead and tin, also hard metals like steel and iron.
Conclusion:
In this article, we have seen the Brinell hardness test and its two different methods – Standard and Non-Standard Brinell hardness tests. Also, discussed its advantages, disadvantages or limitations, and applications. Above you can see the diagram of the Brinell hardness testing machine. If you like this article then feel free to comment down here.
I will like to aquire more knowledge
The article is excellent so I really enjoyed it, thank